Best Way to Applying Eyeshadow Like a Pro: Master These Techniques in Minutes
Have you ever spent 20 minutes applying eyeshadow, only to step back and realize it looks muddy, patchy, or just plain wrong? You’re definitely not alone. Eyeshadow application is one of the most challenging makeup skills to master, but once you understand the fundamental techniques, it becomes second nature.
In this comprehensive guide, we’ll break down everything you need to know about applying eyeshadow properly, from choosing the right tools to mastering professional blending techniques. Whether you’re a complete beginner or someone looking to refine their skills, these tips will transform your eye makeup game.
Why Most People Struggle With Eyeshadow
Before we dive into the how-to, let’s address why eyeshadow can be so tricky. Understanding these common challenges will help you avoid frustration and set realistic expectations.
First, eyeshadow requires a different skill set than most other makeup applications. While foundation and lipstick are relatively straightforward, eyeshadow demands precision, blending, and an understanding of color theory. The small canvas of your eyelid means every movement matters.
Second, not all eyeshadows are created equal. Formula quality varies dramatically between brands and price points. Some shadows are highly pigmented and blend effortlessly, while others are chalky, patchy, or refuse to show up on the skin. This inconsistency can make it difficult to develop reliable techniques.
Third, eye shapes vary significantly from person to person. A technique that works beautifully on one eye shape might need adjustment for another. This is why blindly following tutorials without adapting them to your unique features often leads to disappointing results.
Essential Tools You Actually Need
Let’s start with the basics. You don’t need a drawer full of expensive brushes, but having the right tools makes a world of difference.
The Must-Have Brushes
Fluffy Blending Brush: This is your most important tool. A medium-sized, soft, fluffy brush is essential for blending transition shades and softening harsh lines. Look for natural or high-quality synthetic bristles that are densely packed but still flexible.
Flat Shader Brush: Use this for packing color onto your lid. The flat, compact shape picks up pigment and deposits it exactly where you want it. This brush is perfect for your main lid color and shimmer application.
Precision Crease Brush: Smaller and more tapered than your blending brush, this tool allows you to place color precisely in your crease and outer corner. It’s essential for creating definition and depth.
Pencil Brush: This tiny, pointed brush is perfect for detailed work like smoking out your lower lash line or adding a pop of color to your inner corner.
Other Helpful Tools
While brushes are essential, a few other items can elevate your eyeshadow application. Eyeshadow primer creates a smooth base and helps colors last all day without creasing. A light, neutral concealer can be used to prep your lids if you don’t have primer. Clean makeup sponges or cotton swabs are invaluable for fixing mistakes without starting over.
The Step-by-Step Application Process
Now for the main event. Follow these steps for foolproof eyeshadow application every single time.
Step 1: Prep Your Lids
Never skip this step. Start with clean, moisturized eyelids, then apply a thin layer of eyeshadow primer from your lash line to your brow bone. This creates a smooth canvas, prevents creasing, and makes your eyeshadow colors appear more vibrant and true to pan.
If you don’t have primer, you can use a small amount of concealer that matches your skin tone. Set it lightly with a translucent powder to create a dry base for the eyeshadow to adhere to.
Step 2: Apply Your Transition Shade
This is the secret step most people skip, and it’s the biggest game-changer in eyeshadow application. Your transition shade is a neutral color that’s slightly deeper than your skin tone but not dramatically different. Think soft browns, taupes, or warm beiges.
Using your fluffy blending brush, apply this color in windshield-wiper motions just above your natural crease. This shade acts as a buffer between your skin and the darker colors you’ll add later, making blending infinitely easier and preventing harsh lines.
The transition shade creates a gradient effect and gives your eye makeup a professional, seamless finish. Even if you’re doing a simple one-color look, starting with a transition shade will make your makeup look more polished.
Step 3: Define Your Crease
Now it’s time to add depth. Choose a color that’s darker than your transition shade. Using your precision crease brush, apply this color directly into the crease of your eyelid, focusing on the outer half of your eye.
Use small, controlled motions and build the color gradually. It’s much easier to add more pigment than to remove excess. Once you’ve placed the color, take your fluffy blending brush and gently blend the edges where the crease color meets your transition shade.
The goal is to create a soft gradient with no harsh lines. If you notice any harsh edges, go back with your transition shade on a clean blending brush and soften them out.
Step 4: Pack on Your Lid Color
With your flat shader brush, apply your main lid color. This can be anything from a neutral shimmer to a bold jewel tone, depending on your desired look. The key word here is “pack,” not “swipe.” 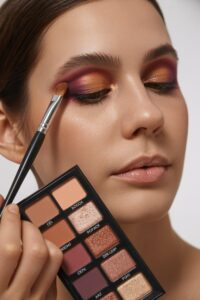
Press the brush onto your lid in patting motions rather than swiping back and forth. This technique deposits maximum pigment and prevents you from disrupting the crease work you’ve already done.
Apply the lid color from your lash line to just below where your crease color begins. You want a clear distinction between your lid and crease for dimension.
Step 5: Add Depth to the Outer Corner
For a more dimensional look, apply your darkest shade to the outer corner of your eye in a small V or C shape. Use your precision crease brush for this step, as it allows for controlled placement.
Start at the outer corner of your lash line and sweep the color upward and slightly inward, following the natural shape of your eye. Then, blend the inner edges of this dark color into your crease shade using gentle circular motions.
This outer corner deepening is what creates that coveted sultry, dimensional eye look. Even a small amount of depth in this area makes a significant difference.
Step 6: Highlight and Define
Using a light, shimmery shade or a matte highlight, apply color to your inner corner and just beneath your brow bone. This brightens your eyes and creates beautiful contrast with the deeper shades you’ve applied.
For the inner corner, use your pencil brush or your ring finger to press the highlight into place. For the brow bone, use a small fluffy brush to sweep the color just under your brow arch.
Step 7: Blend, Blend, Blend
Take a clean fluffy brush and go over all the edges where colors meet. Use light, circular motions and work in the direction that creates the most seamless gradient. This final blending step is what separates amateur eyeshadow from professional-looking makeup.
Don’t over-blend to the point where all your colors become muddy, but do ensure there are no harsh lines or patches anywhere on your lid.
Step 8: Clean Up and Define
Look at your work in natural lighting if possible. Use a cotton swab or makeup wipe to clean up any fallout under your eyes. If needed, use a bit of concealer on a small brush to sharpen and define the edges of your eyeshadow, particularly along the lower lash line.
Pro Tips for Better Results
Work in Natural Lighting: Artificial lighting can distort colors and make it difficult to see what you’re actually creating. Whenever possible, apply your eyeshadow near a window or in well-lit natural light.
Use a Light Hand: It’s always easier to build up color than to remove excess. Start with a small amount of product and gradually add more as needed.
Invest in Quality Formulas: While expensive doesn’t always mean better, investing in at least one good eyeshadow palette makes learning much easier. Look for shadows that are pigmented, blendable, and have minimal fallout.
Match Your Eyeshadow to Your Eye Shape: Learn your eye shape and adapt techniques accordingly. For example, hooded eyes benefit from placing crease colors slightly higher, while deep-set eyes look great with lighter shades in the crease.
Practice Without Foundation First: When you’re learning, practice eyeshadow application before doing the rest of your face. This way, if you need to start over or clean up significant fallout, you won’t ruin your foundation.
Keep Your Brushes Clean: Dirty brushes lead to muddy, patchy application. Clean your brushes regularly with brush cleaner or gentle soap to maintain their performance.
Common Mistakes to Avoid
Understanding what not to do is just as important as knowing the right techniques.
Skipping Primer: Without primer, your eyeshadow will crease, fade, and lose vibrancy throughout the day. This single product makes a dramatic difference in longevity and color payoff.
Using Only the Applicators That Come With Palettes: Those tiny sponge applicators are nearly useless for creating blended, professional looks. Invest in proper brushes.
Applying Too Much Product at Once: Building color gradually gives you control and prevents the muddy look that comes from trying to blend out too much pigment.
Forgetting to Tap Off Excess: Before applying any eyeshadow, tap your brush to remove excess product. This prevents fallout and gives you more control over pigmentation.
Not Blending Enough: When you think you’re done blending, blend a little more. Harsh lines are the telltale sign of amateur eyeshadow application.
Using the Wrong Colors for Your Undertones: Understanding whether you have warm, cool, or neutral undertones helps you choose colors that enhance rather than clash with your natural coloring.
Trending Color Combinations for 2025
Now that you know the techniques, let’s talk about what colors are trending right now.
Warm Chocolate and Copper: Rich, warm browns paired with metallic coppers create a sophisticated, wearable look that flatters most eye colors.
Burgundy and Rose Gold: This combination is perfect for creating romantic, dimensional eye looks. The burgundy adds depth while rose gold provides gorgeous shimmer.
Terracotta and Champagne: Earthy terracotta shades paired with champagne highlights create a warm, sun-kissed effect.
Deep Plum and Silver: For those who love a cooler-toned look, deep plum in the crease with silvery shimmer on the lid is striking and modern.
Monochromatic Browns: All-brown looks remain timeless and incredibly versatile. Use multiple shades of brown from light to dark for a foolproof eye look.
Final Thoughts
Mastering eyeshadow application takes practice, patience, and the right techniques. Don’t get discouraged if your first attempts don’t turn out perfectly. Even professional makeup artists spent years honing their skills.
Start with these fundamental techniques, practice regularly, and don’t be afraid to experiment with different colors and styles. Take photos of your work in natural lighting to track your progress and identify areas for improvement.
Remember, makeup should be fun and creative. There’s no single “right” way to apply eyeshadow. These techniques provide a solid foundation, but feel free to adapt them to your personal style and preferences.
With consistent practice and the tips outlined in this guide, you’ll soon be creating stunning eye looks that rival anything you see on social media or in magazines. The key is understanding the why behind each step so you can troubleshoot problems and adapt techniques to work for your unique features.
Now grab your brushes, choose your colors, and start practicing. Your perfect eyeshadow technique is just a few practice sessions away!

Best Way to Relieve Migraines

Best Way to Apply Natural Makeup in 10 Minutes for Busy Mornings